
This process applies to Sky-Watcher HEQ-5 and EQ6-R mounts but should work with other mounts with slight modifications to the procedure.
Why do we need to Polar Align
Since the Earth is constantly spinning around the celestial north pole, the stars will appear to move around that pole during the night. (It’s actually the Earth that’s moving but from our perspective it appears that stars are moving.)Polar alignment is the process of aligning the RA axis of our telescope mount with the celestial north pole so that when the motor moves our telescope around the RA axis throughout the night, it will track the stars properly.
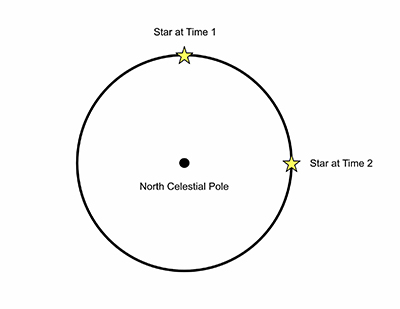
The above diagram shows the celestial north pole and the movement of a star at two points in time during the night.

This diagram shows the same star but the center blue circle indicates that out mount has been polar aligned with the celestial north pole. If we now point our telescope at ‘Star at Time 1’ and wait until time 2, we will find that the movement of the axis motor throughout the night will have resulted in our telescope still pointing to the star at time 2.
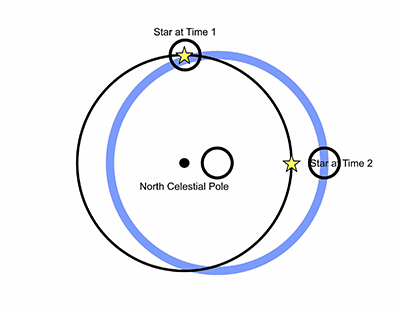
In this diagram, the mount was not polar aligned. Our polar axis was actually pointed to a position right of the celestial polar axis. Not knowing this, we positioned our telescope to point at ‘Star at Time 1.’ At time 2 we find that our telescope is not pointing to the star because the telescope is rotating around a point different from that of the celestial north pole. Note that the black line indicates the precession of the star around the north celestial pole while the blue line indicates the procession of our telescope around our polar alignment point.
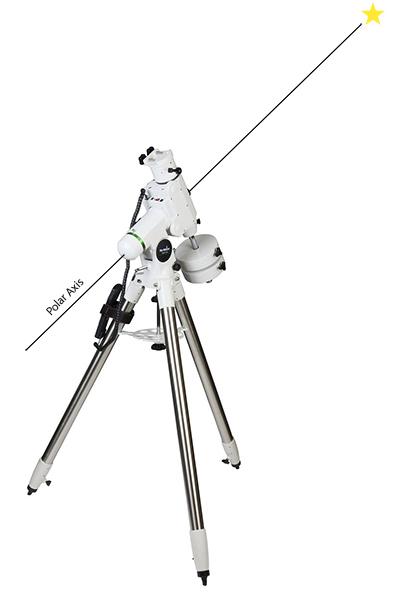
The above image shows the mount polar aligned to the north celestial pole.
Using the North Star (Polaris) for Polar Alignment
In the northern hemisphere, we can use Polaris as a mechanism for polar alignment. Ideally we could just center Polaris in our polar scope and we would be done, but unfortunately Polaris is not located directly on the celestial north pole. It actually revolves around the pole so we need to compensate for this during the polar alignment process. To do this we can use an app to determine the position of Polaris relative to the north celestial pole at the time we are performing polar alignment and polar align so that Polaris is in the same position of our polar scope.
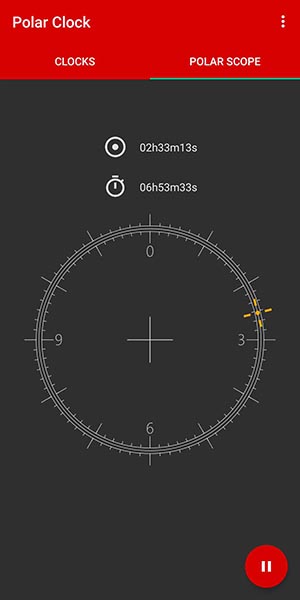
The above image shows the Polar Clock Android app. This displays the location of Polaris (yellow crosshairs) relative to the actual celestial north pole (center crosshairs) at the time the app is run.
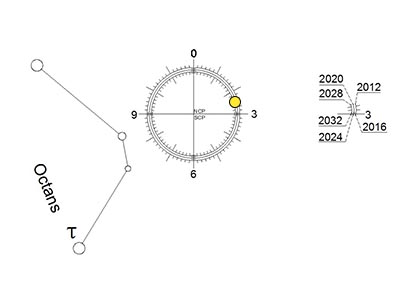
The above image shows the reticule from our polar scope. We position Polaris at the same point on the reticule as it appears in the app which means that the center point on our polar scope is now pointing at the celestial north pole.
Note that although the reticule is aligned in the image to show 0 at the top and 6 at the bottom it really doesn’t matter where these are located during alignment as long as Polaris appears in the same relative position in the reticule. It needs to appear on the circle on the same position as it does in the app.
The Complete Polar Alignment Process
The following is the process I use to polar align my mount. Most of the polar alignment procedures that I’ve seen online have you playing around with the setting circles during the alignment process which is confusing and I believe unnecessary. Setting circles in the past, were used to locate objects in the sky. You would look up the location of a star in an atlas and manually adjust your mount using the setting circles to the location specified. Since most modern mounts have go-to capabilities I believe that this is no longer needed.
- Use a compass or a compass app to determine north. Do this a few feet behind your tripod since the readings will be effected by the metal in the tripod if you do it close to the tripod. Use a dowel on the ground to mark the line going north or just eyeball it so that you have an imaginary line pointing north.
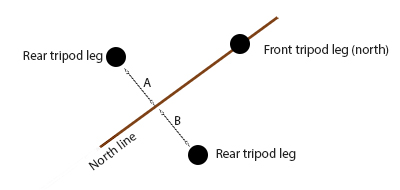
- Position your tripod so that the north indicator on the tripod aligns to the line you determined in the previous step. Then make sure the rear legs are positioned equal distance from the line.
- Level the tripod, taking care not to disturb the north orientation you did in the previous step.
- Attach the mount head to your tripod in accordance with the manufacturers instructions.
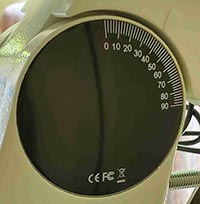
- Use the altitude adjustment bolts and the altitude indicator to adjust the mount head to the latitude of your location. For my location, Lancaster MA, the latitude is 42.452 so I would move the bolts until the arrow on the indicator pointed to about 42.5. This will set your telescope to roughly the height of Polaris above the horizon.
- Place the scope on the mount and a weight on the counterweight shaft. If you’ve done this before you should know the approximate position of the counterweight on the shaft. If not place it at about the halfway point.
- Balance the RA axis of the scope by first unlocking the declination axis clutch and rotating the scope until it’s aligned with the polar axis. Lock the declination axis.
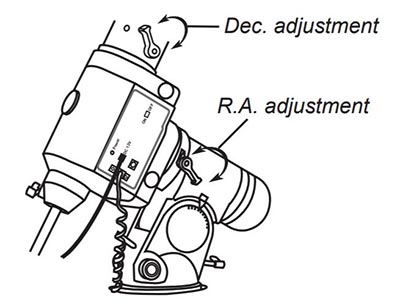
- While holding on to the scope, unlock the RA axis clutch and rotate the scope until the counterweight shaft is horizontal. Slowly release the scope and see if it stays in balance. If it rotates, reposition the counterweight and try again until the scope stays in balance. Once balance is achieved, position the axis so the counter weight is at the bottom and lock the RA axis clutch.
- While holding on to the scope, unlock the declination axis and rotate the scope horizontally. Slowly release the scope and see if it stays in balance. If it rotates, reposition the scope on the mounting plate and try again until the scope stays in balance. Once it’s in balance, rotate the scope until it’s at a ninety degree angle on the declination axis and lock it in place. This will align the internal mechanism of the polar scope allowing you to view the north star. To verify this, pull the cap off the front of the polar scope and remove the cover from the back of the polar scope. If you look through the polar scope reticule, you should be able to see the sky. Replace the cap and cover and wait until dusk.
- The next step is best performed at dusk since Polaris will be visible but most other stars will not be visible making it easier to find Polaris without being distracted by other stars.
- Remove the cap and cover from the polar scope and look through the polar scope reticule. If everything is aligned properly you should be able to see Polaris. Most likely this won’t be the case and you’ll have to adjust the azimuth (X) and altitude (Y) screws to get Polaris into the field of view.
- Start with the azimuth adjustment since this is the easier of the two to adjust. Loosen both azimuth screws and look while looking through the polar scope, slowly rotate the mount in azimuth. If you’re lucky Polaris will appear in the view finder, if not you’ll need to adjust the altitude screws.
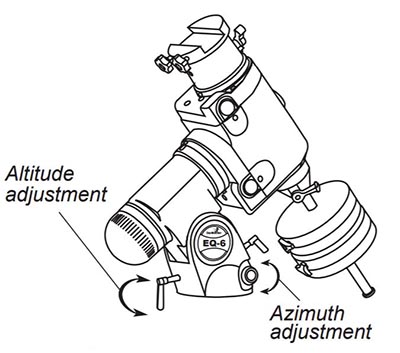
- The altitude screws on the HEQ-5 and the EQ6-R are adjusted by first loosening on and then tightening the other. Be careful when making these adjustments because if you overtighten one while not loosening the other you may snap the adjustment screw.
- Adjust the altitude a bit (either up or down, it’s your guess) and see if you can see Polaris. If not, rotate the scope in azimuth to see if Polaris appears. If this doesn’t work adjust the altitude screws again and try again. Usually, I try adjusting up a bit and then try adjusting down a bit and repeat this until I find Polaris.
- Once you find Polaris, use a Polar Scope app to determine where Polaris should be on the clock for your current time and location. (See the ‘Using the North Star (Polaris) for Polar Alignment’ section above)
- Use the altitude and azimuth screws to move the mount so that Polaris appears in the proper orientation on the reticule. Ideally the reticule indicator will have the zero positioned at the top and the six at the bottom but it really doesn’t matter as long as you position Polaris at the desired position on the clock face.
- Once Polaris is positioned, tighten up both the azimuth and altitude bolts. This can be tricky since the mount tends to move a bit when you do this, so constantly check to make sure that Polaris stays positioned properly.
- When the bolts are tightened a Polaris is in the right position, apply power to your mount so that it starts tracking the night sky.
- Polar alignment is now complete!
2 comments
Thank you very much for this article!! It was very helpful 🙂
Thank you! So much easier than any other instructions I’ve read.