Carnali.com
  • Home
  • Home
Carnali.com

Serving humanity for over fifty years

Python

Python Dictionary Comprehension

by Al February 27, 2022
written by Al

I’ve been busy refreshing my Python skills by working through the excellent udemy, 100 Days of Code: The Complete Python Pro Bootcamp for 2022 course by Dr. Angela Yu.

I’m currently working on day 48 which involves scrapping the Upcoming Events section of the Python.org website using the Selenium WebDriver. In the example code, Dr. Yu shows how to write the output of the scrapping operation into a dictionary using a for loop but says that it also could be accomplished using dictionary comprehension. I decided that would be an interesting challenge and would help to reinforce my knowledge of dictionary comprehension so I gave it a try.

I thought that it would be a fairly easy thing to do but it turned out to be more complex that I anticipated. I did a search for examples and came up with nothing so I’ve decided to share what I found here, hoping that it might help someone else.

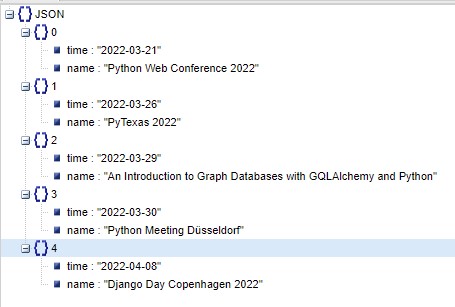
Lets start by showing the desired output structure:

and here’s the code that I used to accomplish the task:

from selenium import webdriver
from selenium.webdriver.common.by import By

chrome_driver_path = "C:/Development/chromedriver.exe"

THE_URL = "https://www.python.org/"

driver = webdriver.Chrome(executable_path=chrome_driver_path)

driver.get(THE_URL)

event_times = driver.find_elements(By.CSS_SELECTOR, value=".event-widget time")
event_names = driver.find_elements(By.CSS_SELECTOR, value=".event-widget li a")

events = {}

events = {x: {"time": value[0].text, "name": value[1].text} for x, value in enumerate(zip(event_times, event_names))}

print(events)

driver.quit()

Most of it is pretty straight forward. I use the find_elements function to create two lists containing times and event using the CSS_SELECTOR as the key. Next comes the fun part, using dictionary comprehension to massage the results into the desired format.

Here’s an explanation of what’s going on:

The zip function combines the two list together allowing you to access both the time and name data simultaneously during each iteration of the loop. If we were just creating a dictionary with time and event data this would be alright but we are really trying to create a set of dictionaries within dictionaries with the key to outer dictionary being an integer value from 0..n. To accomplish this, we need to pass the zip function to the enumerate function.

The enumerate function will take the output of the zip function, wrap in into a tuple and associate it with an index value. The ‘for x, value’ part of the statement is assigning names to those values with x representing the index and value representing the tuple.

The final part of the statement ‘{x: {“time”: value[0].text, “name”: value[1].text}’ is pretty much standard dictionary comprehension stuff, were using the values we’ve just retrieved to write out the entries to the dictionary. Note that we access the both the time and name values by dereferencing the tuple using and index value.

The code is not all that complicated and once written it seems pretty obvious but if your just starting out with this stuff it could be intimidating. I hope this example will help someone else trying to accomplish the same task.

February 27, 2022 0 comment
0 FacebookTwitterPinterestEmail
AstronomyPhotographyTechnology

Horsehead Nebula and Flame Nebula

by Al November 15, 2021
written by Al
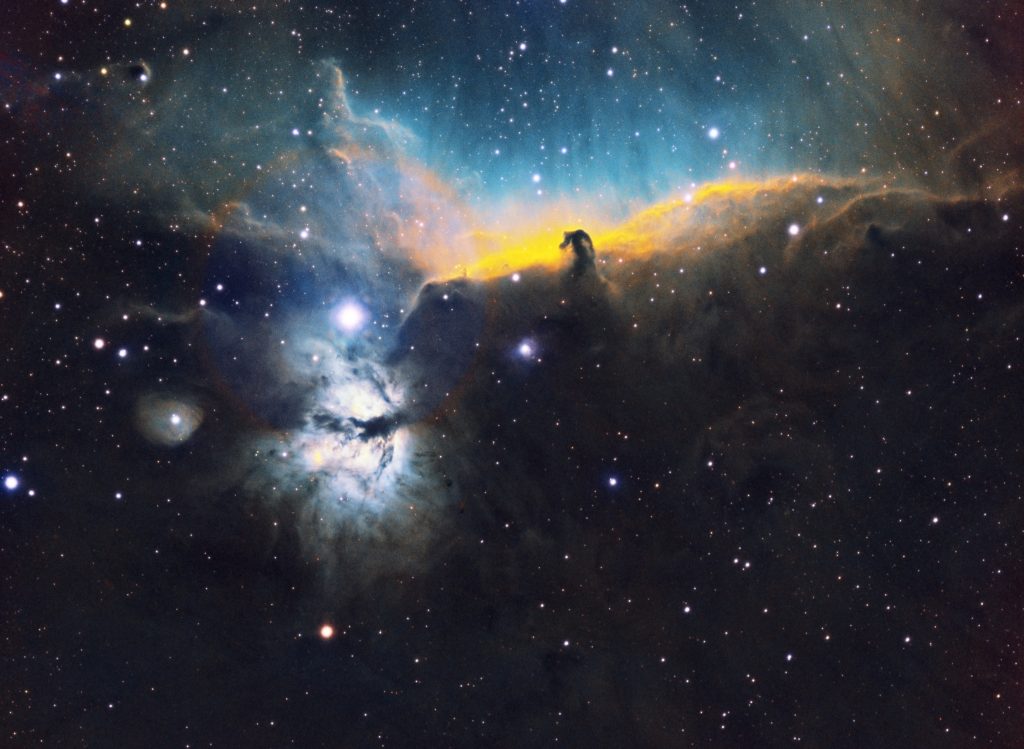
Horsehead Nebula and Flame Nebula

The Horsehead Nebula and Flame Nebula (lower left). Narrowband hydrogen-alpha, sulfur II and oxygen III data was acquired over two nights, processed using Pixinsight and the channels were mapped to the Hubble Palette. Not my favorite color combination but it does bring out a lot of detail in the image.

Astrophotography is tough. Before you can produce anything of interest, you first need to learn how to use your equipment to acquire images and then you need to learn how to use the software tools to process those images.

On the acquisition side, you’re having to master the use of a lot of different hardware. You need to understand and be able to set up a telescope, a mount, an auto-focuser and a color wheel and connect all of these to a computer so you can guide the mount and acquire your images. If you make a mistake with any of these, you have probably wasted a nights worth of work. You can look for help online but everyones setup is slightly different so you’ll probably have to do a lot of experimentation to make your own equipment work properly.

On the processing side, the tools are daunting. My processing tool of choice is called Pixinsight which consists of a suite of processes that you run your images through to achieve your final image. Almost all the processes have multiple parameters that you can tweek to control the mathematics behind the processing of the images. I suspect few actually understand what all of the parameters do and mostly rely on experimentation to determine the best values for their images.

Understanding what processes to use and the order in which to apply them is another challange. For me, as I suspect it is for most people, the path to learning was to watch lots of YouTube videos, try out the various techniques, and over time, build up a repertoire of things that work while tossing out the things that dont. This takes many hours and often ends with sub-optimal results that you end up just throwing away. It can be frustrating.

Unless you have lots of time and patience, you should probably consider another hobby. On the other hand, if you like challenges and are willing to put in the time, it can be really fun.

November 15, 2021 0 comment
0 FacebookTwitterPinterestEmail
Personal

Retired?

by Al October 9, 2021
written by Al

Maybe, maybe not. To be determined. All I know is that for the last year or so, I sat in a little room, masked up and pretty much chained to an x-ray machine developing software for the company’s next generation system. The people there were nice, the product was interesting but I just decided I couldn’t take it any more.

Most places where I have worked I’ve been able to shift my hours around a bit so that I could come in early and leave early, allowing me to have a little bit of time to do the things that I want. Unfortunately, at this place for a good portion of the year they held meetings from 5 to 6 pm most days, which made it impossible for me to shift my hours. My day was get up, go to work, come home, eat dinner, watch a bit of TV with my wife and go to bed. Saturdays were mostly spent doing chores and recovering from the work week, which left Sundays as the only day I had for myself. I didn’t have time to enjoy life, didn’t have time to exercise and didn’t have time to just relax.

A few weeks ago, I just decided it was time to leave. It was tough walking away from the paycheck, but I felt like a zoo animal in a tiny cage and believed that if it went on much longer my health would suffer.

Anyway, I’m free. At least for now. I’m not sure what I’m going to do in the future. New full time job, part time job, permanently retire, run for president? Who knows. I need at least a few weeks to recover and think things through and maybe then I’ll have a better idea of what I want to do when I grow up.

October 9, 2021 0 comment
0 FacebookTwitterPinterestEmail
Astronomy

The Pelican Nebula (IC5070)

by Al June 19, 2021
written by Al

Finally some good weather. Thursday, 6/17/2/21 I had a chance to get out and do some astrophotography. Since I have a relatively small telescope and live in an area with a decent amount of light pollution, I decided the target would be IC5070, the Pelican Nebula. At this time of year Earth is facing away from the center of the galaxy during the night so the targets are limited; mostly consisting of galaxies. Even though the galaxies are massive, the distance from Earth makes them relatively small and without a decent size telescope the images you can produce of them are not too impressive. On top of that light pollution makes them difficult to shoot. Nebulas, on the other hand, emit light at specific frequencies so with a set of filters you can get some decent images of them.

The images were shot using a Zenithstar 73 APO telescope on an HEQ5 Equatorial mount. The camera I used was a ZWO ASI1600MM pro. I took 10 frames each of Hydrogen, Oxygen and Sulfur with an exposure of 450 seconds for each. I also took 10 dark frames at 450 seconds each, 100 bias frames at 0.001 seconds and 20 flat frames for each filter using an automatic exposure which produces a peak at around 32000 on the histogram. The dark, bias and flat frames are used during processing to reduce camera noise and compensate for distortion introduced in the imaging chain. Camera gain was set to 0 (a mistake) and the camera was cooled to -10C.

Processing was done using a combination of PixInsight and Photoshop. I used PixInsight for noise reduction and integration and, since I’m still new to PixInsight, switched over to Photoshop to combine and process the RGB layers.

Highlights from the night included multiple mosquito bites, a set of eyes staring at me at about eye level in the bushes, which I’m assuming was a deer but possibly could have been a bear or my neighbor and a bunny looking up at me from about two feet away.

I also got a chance to check out my new Jackery E500 Power Station. Up until this time I had been running an extension cord out to my setup but since I want to be able to image from different locations I decided to purchase a Jackery. The Jackery is a nicely contained set of lithium batteries, that while expense, is a lot lighter and easier to carry around then a deep cycle car battery.

The Jackery performed flawlessly. At the end of the night, the indicator showed I had only used 25% of it’s capacity. That number was even better than what my calculations had shown. It powered the ASI Air computer, an auto-focuser, the mount, both the main camera and the guiding camera as well as the heater used to prevent dew. I’m very pleased with the purchase.

I was happy with the end result. My processing skills are still lacking but the image came out pretty good considering where I am on the learning curve. Hopefully, we’ll have another clear night soon and I can image some other targets.

June 19, 2021 0 comment
0 FacebookTwitterPinterestEmail
Culture

Transgender Mafia and their Woke Mob

by Al May 19, 2021
written by Al

I posted the above on Facebook, but I’m putting it here too since I have no doubt it will soon disappear into the ether. It’s scary and disgraceful what’s going on in the world right now. A small percentage of the population is in the process of destroying freedoms and rights that make out country and civilization unique.

Maybe they truly believe their making the world a better place but I suspect that for the most part they’re just a bunch of insecure losers with pathetic lives that get off destroying people for their own sadistic gratification.

May 19, 2021 0 comment
0 FacebookTwitterPinterestEmail
Astronomy

Polar Alignment using an HEQ-5 or EQ6-R Mount

by Al May 16, 2021
written by Al

This process applies to Sky-Watcher HEQ-5 and EQ6-R mounts but should work with other mounts with slight modifications to the procedure.


Why do we need to Polar Align

Since the Earth is constantly spinning around the celestial north pole, the stars will appear to move around that pole during the night.  (It’s actually the Earth that’s moving but from our perspective it appears that stars are moving.)Polar alignment is the process of aligning the RA axis of our telescope mount with the celestial north pole so that when the motor moves our telescope around the RA axis throughout the night, it will track the stars properly.

The above diagram shows the celestial north pole and the movement of a star at two points in time during the night.

This diagram shows the same star but the center blue circle indicates that out mount has been polar aligned with the celestial north pole.  If we now point our telescope at ‘Star at Time 1’ and wait until time 2, we will find that the movement of the axis motor throughout the night will have resulted in our telescope still pointing to the star at time 2.

In this diagram, the mount was not polar aligned.  Our polar axis was actually pointed to a position right of the celestial polar axis.  Not knowing this, we positioned our telescope to point at ‘Star at Time 1.’   At time 2 we find that our telescope is not pointing to the star because the telescope is rotating around a point different from that of the celestial north pole.  Note that the black line indicates the precession of the star around the north celestial pole while the blue line indicates the procession of our telescope around our polar alignment point.

The above image shows the mount polar aligned to the north celestial pole.


Using the North Star (Polaris) for Polar Alignment

In the northern hemisphere, we can use Polaris as a mechanism for polar alignment.   Ideally we could just center Polaris in our polar scope and we would be done, but unfortunately Polaris is not located directly on the celestial north pole.   It actually revolves around the pole so we need to compensate for this during the polar alignment process.  To do this we can use an app to determine the position of Polaris relative to the north celestial pole at the time we are performing polar alignment and polar align so that Polaris is in the same position of our polar scope.

The above image shows the Polar Clock Android app.  This displays the location of Polaris (yellow crosshairs) relative to the actual celestial north pole (center crosshairs) at the time the app is run.

The above image shows the reticule from our polar scope.  We position Polaris at the same point on the reticule as it appears in the app which means that the center point on our polar scope is now pointing at the celestial north pole.

Note that although the reticule is aligned in the image to show 0 at the top and 6 at the bottom it really doesn’t matter where these are located during alignment as long as Polaris appears in the same relative position in the reticule.  It needs to appear on the circle on the same position as it does in the app.


The Complete Polar Alignment Process

The following is the process I use to polar align my mount.  Most of the polar alignment procedures that I’ve seen online have you playing around with the setting circles during the alignment process which is confusing and I believe unnecessary.  Setting circles in the past, were used to locate objects in the sky.  You would look up the location of a star in an atlas and manually adjust your mount using the setting circles to the location specified.  Since most modern mounts have go-to capabilities I believe that this is no longer needed.

  1. Use a compass or a compass app to determine north.  Do this a few feet behind your tripod since the readings will be effected by the metal in the tripod if you do it close to the tripod.  Use a dowel on the ground to mark the line going north or just eyeball it so that you have an imaginary line pointing north.
  2. Position your tripod so that the north indicator on the tripod aligns to the line you determined in the previous step.  Then make sure the rear legs are positioned equal distance from the line.

  3. Level the tripod, taking care not to disturb the north orientation you did in the previous step.
  4. Attach the mount head to your tripod in accordance with the manufacturers instructions.
  5. Use the altitude adjustment bolts and the altitude indicator to adjust the mount head to the latitude of your location.  For my location, Lancaster MA, the latitude is  42.452 so I would move the bolts until the arrow on the indicator pointed to about 42.5.  This will set your telescope to roughly the height of Polaris above the horizon.
  6. Place the scope on the mount and a weight on the counterweight shaft.  If you’ve done this before you should know the approximate position of the counterweight on the shaft.  If not place it at about the halfway point.
  7. Balance the RA axis of the scope by first unlocking the declination axis clutch and rotating the scope until it’s aligned with the polar axis. Lock the declination axis.
  8. While holding on to the scope, unlock the RA axis clutch and rotate the scope until the counterweight shaft is horizontal.  Slowly release the scope and see if it stays in balance.  If it rotates, reposition the counterweight and try again until the scope stays in balance.  Once balance is achieved, position the axis so the counter weight is at the bottom and lock the RA axis clutch.
  9. While holding on to the scope, unlock the declination axis and rotate the scope horizontally.  Slowly release the scope and see if it stays in balance.  If it rotates, reposition the scope on the mounting plate and try again until the scope stays in balance.  Once it’s in balance, rotate the scope until it’s at a ninety degree angle on the declination axis and lock it in place.  This will align the internal mechanism of the polar scope allowing you to view the north star.  To verify this, pull the cap off the front of the polar scope and remove the cover from the back of the polar scope.  If you look through the polar scope reticule, you should be able to see the sky.  Replace the cap and cover and wait until dusk.
  10. The next step is best performed at dusk since Polaris will be visible but most other stars will not be visible making it easier to find Polaris without being distracted by other stars.
  11. Remove the cap and cover from the polar scope and look through the polar scope reticule.  If everything is aligned properly you should be able to see Polaris.  Most likely this won’t be the case and you’ll have to adjust the azimuth (X) and altitude (Y) screws to get Polaris into the field of view.
  12. Start with the azimuth adjustment since this is the easier of the two to adjust. Loosen both azimuth screws and look while looking through the polar scope, slowly rotate the mount in azimuth.  If you’re lucky Polaris will appear in the view finder, if not you’ll need to adjust the altitude screws.
  13. The altitude screws on the HEQ-5 and the EQ6-R are adjusted by first loosening on and then tightening the other.  Be careful when making these adjustments because if you overtighten one while not loosening the other you may snap the adjustment screw.
  14. Adjust the altitude a bit (either up or down, it’s your guess) and see if you can see Polaris.  If not, rotate the scope in azimuth to see if Polaris appears.  If this doesn’t work adjust the altitude screws again and try again.  Usually, I try adjusting up a bit and then try adjusting down a bit and repeat this until I find Polaris. 
  15. Once you find Polaris, use a Polar Scope app to determine where Polaris should be on the clock for your current time and location.  (See the ‘Using the North Star (Polaris) for Polar Alignment’ section above)
  16. Use the altitude and azimuth screws to move the mount so that Polaris appears in the proper orientation on the reticule.  Ideally the reticule indicator will have the zero positioned at the top and the six at the bottom but it really doesn’t matter as long as you position Polaris at the desired position on the clock face.
  17. Once Polaris is positioned, tighten up both the azimuth and altitude bolts.  This can be tricky since the mount tends to move a bit when you do this, so constantly check to make sure that Polaris stays positioned properly.
  18. When the bolts are tightened a Polaris is in the right position, apply power to your mount so that it starts tracking the night sky.
  19. Polar alignment is now complete! 

May 16, 2021 1 comment
0 FacebookTwitterPinterestEmail
CultureUncategorized

Rush Limbaugh RIP (1951-2021)

by Al February 17, 2021
written by Al

We all knew this was coming but it still hurts. Limbaugh was an incredible man that was both inciteful and entertaining. He stood up when most others were afraid to do so and let the rest of us know that it was ok to be conservative. For over thirty plus years, five days a week, three hours a day he educated and entertained us and it never got boring. That’s a pretty big accomplishment.

I’m convinced that the country would be in a much worse place today if it wasn’t for Rush. He slowed down the take over by the left and trained a generation of people how to fight for what you believe in.

Thank you Rush. The world is a better place because of you. You made a difference.

February 17, 2021 0 comment
0 FacebookTwitterPinterestEmail
Politics

The Most Acquitted President in History

by Al February 16, 2021
written by Al

It’s like watching a Road Runner cartoon. Every time the Democrats are about to drop an anvil on Trump it flips around and comes crashing down on them.

They’ve tried connecting him to the Russians, tried getting him on tax evasion, tried getting him for inciting insurrection and yet nothing sticks. Either Trump is a hell of a lot smarter than they are or the Democrats are a bunch of lying, race baiting weasels with nothing of substance to offer so they have to resort to lying, pitting people against each other and cheating in order to win. Or maybe it’s all of the above.

February 16, 2021 0 comment
0 FacebookTwitterPinterestEmail
Reviews

Julie & Julia (Movie Review)

by Al February 15, 2021
written by Al

This is a very enjoyable movie about the life of Julia Child and a young woman, Julia Powell, who decides to cook and blog about every recipe in Child’s cookbook, “Mastering the Art of French Cooking.”

Meryl Streep, of whom I’ve never been a fan, does an amazing job of portraying Julia Child. She captures her mannerisms and vocal patterns perfectly and makes you believe that she truly is Julia Child. I looked it up and found that although nominated for the Oscar for Best Performance by an Actress in a Leading Role she did not win. Instead the Oscar went to Sandra Bullock for her role in “The Blind Side.” Bullock was wonderful in that movie but Streep did something really special here and it’s a real travesty that she did not win.

Before watching this movie I assumed that Julie would somehow have met Julia and that the movie would be about their interactions. Turns out that is not the case at all. Surprisingly the two never met. The movie is actually two separate stories, one about Julia Child’s life in France and her learning to cook and getting the book published while the other is about a self-centered, annoying, unhappy young woman who finds meaning in her life cooking Child’s recipes and blogging about them.

As I mentioned earlier, the movie is very good, but in the end I found myself wondering why they just didn’t make a movie about Julia Child instead. The woman had a fascinating life and they didn’t have enough time to cover it because of the dual threads in this movie. The Julie story, while somewhat interesting, really amounted to nothing in the end; just an unhappy woman with an obsession about Julia Child. I guess they probably figured the Julie aspect might bring in younger viewers but it seems to me like they really missed an missed opportunity.

February 15, 2021 0 comment
0 FacebookTwitterPinterestEmail
Culture

We All Know Someone Like This

by Al February 13, 2021
written by Al
February 13, 2021 0 comment
0 FacebookTwitterPinterestEmail
Newer Posts
Older Posts

Categories

  • Adventure
  • Astronomy
  • Culture
  • Fun
  • Interesting
  • Music
  • Other
  • Personal
  • Photography
  • Politics
  • Python
  • Reviews
  • Slider
  • Technology
  • Uncategorized
  • Facebook
  • Twitter
  • Youtube

@2019 - All Right Reserved. Designed and Developed by PenciDesign


Back To Top