

This is the second in a series of articles that I’m posting that will describe the process you need to go through to configure different programs to work with the Yaesu FTDX101D transceiver. I’m doing these articles because I just recently went through the setup process on my own system and found while there’s plenty of information out there, it’s sometimes confusing and often doesn’t fully describe what is happening during configuration process. I hope that these articles will simplify things and help other users that might be intimidated by the complexity of setting up their hardware. Before starting the process, you should review my previous post, ‘Installing and Configuring Device Drivers for the Yaesu FTDX101D’ to make sure your radio is configured properly.
N1MM Logger appears to be the logging program of choice for amateur radio contests. A lot of hams use it as a contesting log because of it’s many contesting features but after the contest is completed will export the data to another general logger that they use to log all of their contacts.
N1MM allows you to automate a lot of the steps when contesting. For example, when using Morse code, you can load a configuration for a state QSO party, and just press function keys to perform the contesting exchange instead of using a Morse key and doing it manually. While this may seem like cheating to some, contesters like it because of the quick turnaround of contacts, beginners like it because they are prone to making sending mistakes and other like it because it’s just easier than sending code manually. For the automatic features to work, the program needs to be able to communicate with your radio. The rest of this article will tell you how to do that.
Note that I’m using a Yaesu FTDX101D radio during this procedure but any Yaesu radio should have a similar setup and other non-Yaesu radios will probably work pretty much the same with some minor tweaks to the process.
Here’s how to do it…
- Launch N1MM Logger and select ‘Config’ > ‘Config Ports, Mode Control, Winkey, etc…’ then select the ‘Hardware’ tab.

- At the top of the dialog you will see three radio boxes, these are used to select the type of hardware configuration you are using.
- ‘SO1V’ is the simplest. It used when your radio has just one VFO that you will be using for both transmitting and receiving.
- ‘SO2V’ is used when your radio has two VFOs. Selecting this will configure the program to work with both and will display two separate dialogs during normal operation with each one allowing you to control a separate VFO. For example, one dialog/VFO could be used to work the 20M band, while the second could be used to work the 40M band.
- ‘S02R’ is similar to ‘SO2V’ except instead of controlling to VFOs on the same radio, you are controlling to separate radios.
- To keep things simple, even though the FTDX101D contains 2 VFOs, I’m only using one and thus will select ‘SO1V’.
- Next, we’ll set up CAT control for N1MM. This allows the software to control the radio and do things like change and read frequencies, modes and bands. It also enables the software to read and set many of the parameters used by the radio. On Yaesu radios, CAT control is accomplished using the Enhanced COM port and on my computer it is mapped to COM4, so on the first line we set ‘Port’ to ‘COM4’ and ‘Radio’ to ‘FTDX101D’. The ‘Radio’ field is used by the program so that it understands what messages to use during communications and what features are supported.
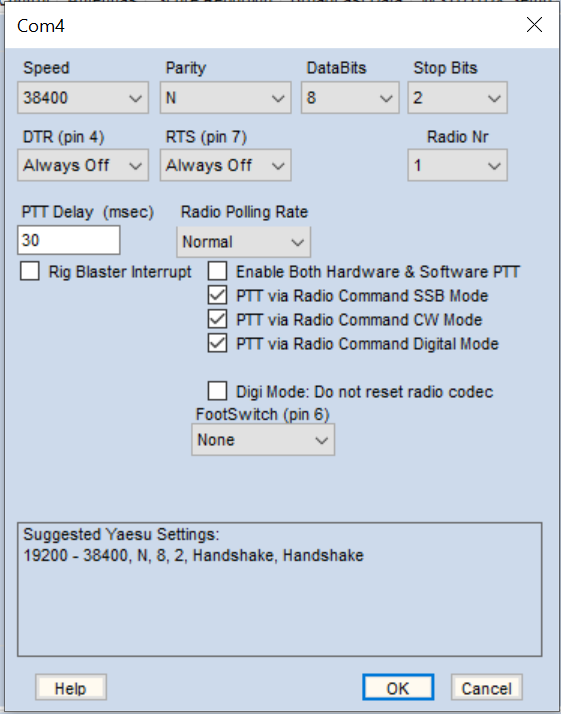
- Now press the ‘Set’ button and set the following values:
- ‘Speed’ to ‘38400’
- ‘Parity’ to ‘N’
- ‘Databits’ to ‘8’
- ‘Stop Bits’ to ‘2’
- ‘DTR’ to ‘Always Off’
- ‘RTS’ to ‘Always Off’
- ‘Radio Nr’ to ‘1’
- Select ‘OK’ to save the changes. We use these values because they match the values we used when we configured the radio and the drivers in the previous article. They describe the speed and rules that the radio, computer an N1MM use to talk to each other. You can use different values if you like but just make sure they are consistent between all three devices.
- In this step, we set up keying for N1MM. This allows the software to key the radio instead of you having to push a button or press a Morse key. On Yaesu radios, this is done using the Standard COM port. On the second line of the dialog, select the port that’s mapped to your standard COM port, for me it’s ‘COM3’, leave the ‘Radio’ set to ‘None’, and check the ‘CW/Other’ check box.
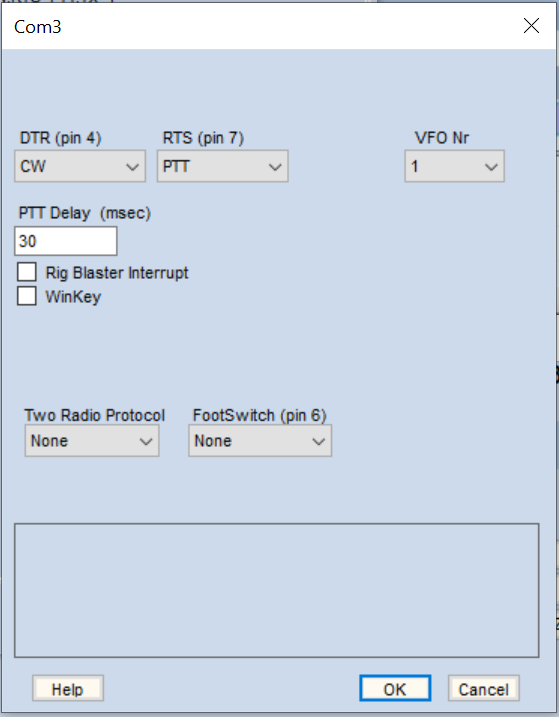
- Press the ‘Set’ button and set the following:
- ‘DTR’ to ‘CW’
- ‘RTS’ to ‘PTT’
- Select ‘OK’ to save the changes and ‘OK’ a second time to close the ‘Configurer’ dialog. This setup is simpler than the one for the Advanced COM port because there’s no data transfer involved, Yaesu keys the radio based only on the state of the DTR pin or the RTS pin. So essentially, only a single line is used on this port.
- Finally, verify that CAT control works by tuning your receiver and seeing if the N1MM frequency display in the title bar of your dialog updates. As a second check, click on one of the bands in N1MM and see if it changes the band on your radio. If these tests fail something is wrong with your enhanced com port settings you will need to troubleshoot it. You can check to make sure that keying is taking place by connecting your radio to a dummy load, turning down the power and pressing one of the function keys used during an exchange. If everything is working your radio should start transmitting and you will hear keying taking place.