

I seem to be on a bit of a roll lately, complaining about companies and the workarounds and fixes needed to compensate for their marginal designs, so let’s keep it going for one more day.
I brought my car into the dealership on Wednesday for an oil change and tire rotation (I had a coupon), and while I was waiting for the work to be completed, the technician came out and informed me that a mouse had built a large nest in the blower and cabin filter assembly. This was a surprise to me, since I hadn’t heard any of the rattling you usually hear when debris gets into the system, and my rather sensitive nose hadn’t detected any bad smells. The technician told me they could clean it out, but it would take about 2 hours and cost $265. Since I didn’t feel like sitting around for an additional two hours, I had already been there an hour, and $265 dollars seemed like an excessive price for cleaning out a mouse nest, I declined his generous offer.
When I got home, I did a bit of research online and found that this was a pretty common issue in Honda CR-Vs. Part of the problem is that Honda chose to install a five-inch-by-nine-inch inlet in the firewall that allows air to enter the system,, and there is no screening over it to prevent a mouse or chipmunk from entering and setting up residence.
One guy posted a solution that involved putting wire-mesh screening over the inlet, fastened with self-tapping screws, but it required first removing the wiper blades and a plastic cowling that apparently had proprietary retaining hardware that would break during the process and require replacement. To actually remove the nest, he removed a plastic cover from the bottom of the dashboard, disconnected a couple of electrical cables, unscrewed and dropped the blower assembly to get access to the area for cleaning. While all of this seemed like the perfect solution, it was pretty complex, and I really didn’t want to deal with it. I especially didn’t want to pierce the firewall with self-tapping screws, since there was a risk of damaging something and creating an area that could rust out over time.
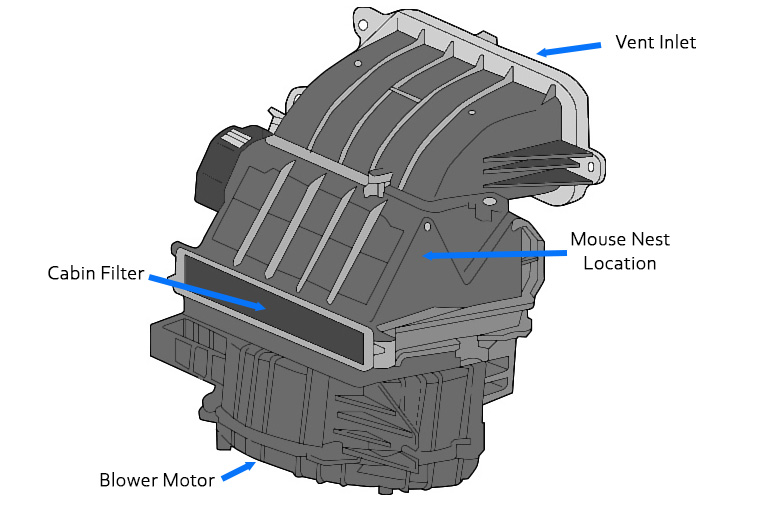
I was able to dig up some photos and diagrams of the whole assembly and found that it was actually pretty simple. The intake on the firewall leads to a chamber, and at the bottom of the chamber is the cabin filter. Below the cabin filter is the blower assembly. When the mice get into the vent, they can build a nice, comfortable nest on top of the cabin filter. When you slide out the cabin filter to replace it, acorns and debris from the nest fall into the blower assembly and act like a ball spinning on a roulette wheel when you power on the blower. Yet another bad design. If they really wanted to fix the problem, they could put a screen over the inlet as the guy on the Internet did, and as a fallback, put a second panel above the cabin filter, which you could pull off, allowing you to vacuum out the area before taking out the cabin filter, preventing any debris from entering the blower. Unfortunately, I guess the allure of making $265 every time someone had a mouse infestation was just too much for them.
Since I was too cheap to pay to have the mouse nest removed and not ambitious enough to do the process the other guy described, I came up with another method that I figured would be a good compromise.
First, I ignored the open inlet. It sucks and will probably be a problem in the future, but for now, my goal was just to clean out the mouse nest. I got out my wet/dry vac and put on the attachment with the narrow, flat inlet, which was small enough to fit into the cabin filter slot. I then opened the glove box, slid out the filter just a bit to keep debris from falling into the blower, and inserted the wet/dry vac attachment between the filter and the top of the opening. Since the filter is made from corrugated paper, this wasn’t too difficult. I then slowly backed out the filter while leaving the vacuum in place, allowing it to suck out part of the mouse nest. After completely removing the filter, I looked into the chamber with my endoscope and found there was still a decent amount of mouse garbage, so I put the vacuum nozzle in the slot and worked it around until all the stuff was removed. Using the endoscope again, I noticed that a few acorns had fallen into the blower as well as some crunched-up leaves. Since I couldn’t get the vacuum attachment into the blower area, I reinserted it into the cabin filter slot and used my fingers, also in the slot, to rotate the blower while lifting out debris and feeding it into the vacuum. This was probably the slowest part of the operation, but when I checked it with the endoscope, it appeared successful.
As a final test, I started the car and ran the blower at full speed to make sure that it sounded OK. It did. I then put my new cabin filter in ($9.85 on Amazon) and reattached the glove box assembly. Problem solved with a total savings of $255.15.
I know this wasn’t the perfect solution, but it was good enough, and sometimes good enough is good enough. Hopefully, this post will help someone else save some money if they ever run into the problem.
I’ve recently started periodically spraying both my wife’s and my engine compartments with peppermint spray because I’ve heard it keeps rodents away. I don’t know if it’s true, but it’s worth trying. Hopefully, I will not have to go through this again.