

A few years back I started to tune my own piano.
Before I retired, I had lots of money and little time so it made sense to have someone else do the job. Since retiring, the equation has changed, now I have lots of time and less money so it makes sense to do it myself.
I was a little hesitant at first since it seemed pretty complex and there was a lot of potential for things to go wrong. I have a pretty decent quality Italian/Germany Schulze Pollmann piano and it would be a shame to destroy it if things went horribly wrong, but being a typical guy, I jumped in and hoped for the best.
Turns out, while it’s hard work, it’s not as complex as it seems. I’m going to describe the process here in case someone wants to try it themself or is just interested in what it takes. Be warned though, things can go wrong so if you attempt it yourself, you may or may not be successful.
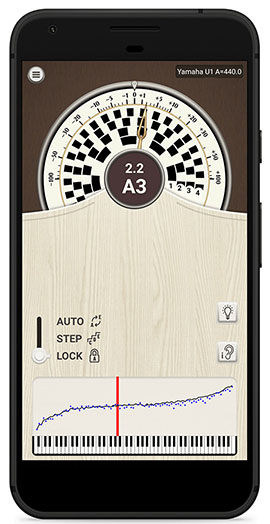
After doing a bit of research I decided that the use of a piano tuning app would greatly simplify the process. I ended up going with an app called PianoMeter. There are both Apple and Android versions and depending on the version you buy, it can be expensive. The Plus version sells for a one time fee of $30 while the Pro version goes for $350 or if you want to go the subscription route, you can pay $70 a year.
If you only plan on tuning a single piano and your piano is not drastically out of tune, you can make do with the Plus version. If you’re tuning multiple pianos and/or your piano is way out of tune, you’ll need the Pro version. The most important differences between the Plus and the Pro version is that the Pro allows you to save and load tuning files and, more importantly, allows you to perform pitch raises.
A pitch raise is a rough tuning that involves tuning the piano slightly above the normal pitch so that the strings are stretched a bit above that of a standard tuning which helps to allow the piano to hold its tune when the real tuning is performed. If you don’t perform a pitch raise on a severely out of tune piano you will find your piano will quickly fall out of tune.
I went with the Pro version subscription since my piano had not been tuned in quite a few years.
To perform the pitch raise using the app, you place your phone with the app running, close to or in the piano and select the pitch raise option. The software will then have you play individual notes on the keyboard so that it can create a tuning curve which is a profile of the current piano tuning that will be used by the app during the tuning process.
Next, you will start tuning the mid-range of the piano, followed by the top end and finally the lower end.
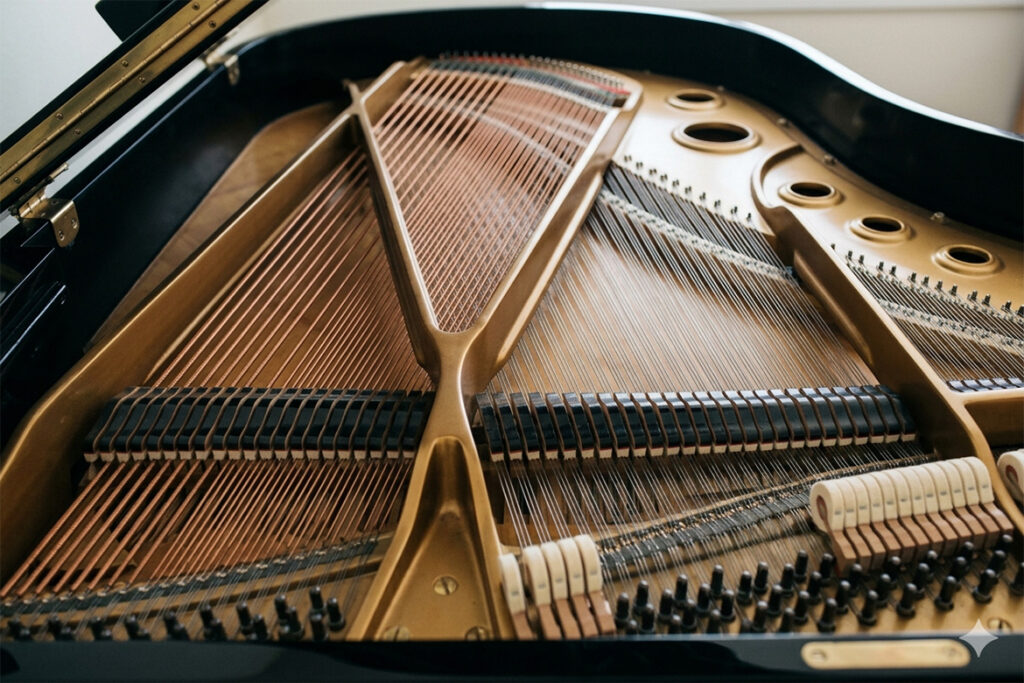
The mid-range is the most complex since, when you play a note, the hammer hits three different strings all of which have to be tuned to the same pitch. You start by using mutes (little rubber wedges) to keep two of the strings from vibrating while you tune the third using the frequency meter on the PianoMeter app.
The frequency meter is a circular meter that indicates the value of the note you are playing, as well as how close it is to the desired pitch. The way it indicates this is with blocks that rotate around the center of the meter. The goal is to stop the blocks from moving and this is accomplished by using a tuning hammer to adjust the pin connected to the string whose pitch you are adjusting. You first lower the pitch a bit while listening to make sure that you hear the pitch change indicating that you are on the correct string. If you don’t do this, and are on the wrong string, you could end up breaking it. Next, you raise the pitch using jerky motions (I’m told this helps the pin to hold) until you finally see the meter stop moving. Sometimes this is easy, but other times you will struggle with it depending on how tight and stable the pin is. Once you have the first string in tune, you pull one of the mutes and adjust the second string by playing the note and zero beating it. When you play two string simultaneously, they will produce a wavering sound and the goal is to eliminate this wavering by adjusting the tension on the string. When the waver is gone, the two strings are now perfectly tuned. Now, pull the second mute and do the same for the third string. Mission accomplished, congratulations! You now only have 87 more notes to go.
The process sounds difficult but with patience you can do it. The hard part is that it’s tedious, takes a lot of time and is tough on the back since you’ll be leaning over the piano a lot. There’s also the potential for breaking a string. It’s important to check and then double check to make sure the pin you are turning with the hammer is the one connected to the string you are attempting to tune. If you’re on the wrong note and you tighten the string too much it will break.
Once you have completed the middle section pitch raise, you move on to the upper section. The nice thing here is that most of the notes only have one string. The bad thing is that since the strings are so short, they change pitch quickly when being adjusted and it’s hard to fine tune them to the correct pitch.
Finally, you move on to the lower section, which if you’ve gotten this far shouldn’t be that difficult.
Congratulations yet again. You’ve completed the pitch raise. Now you have to move on to the actual tuning. To do this, exit the pitch raise section of the app and start the tuning process. The app will now re-calibrate itself so that when you stop the circles from rotating you will be tuned to the real pitch instead of the slightly higher pitch required for the pitch raise.
You once again go through the process I described above to tune all the strings and when completed your piano should sound great.
When I do this, I usually do the pitch raise on one day and wait until the next day to do the tuning. Mostly, it’s because I’m tired from doing the pitch raise process and require a day to recover but I also suspect that waiting gives the piano and it’s strings time to settle into a new equilibrium.
I think I do a pretty good job tuning my own piano but I have little doubt that a professional could do it better. When I tune it, the results are acceptable which, since I’m not giving concerts, is good enough for me.
Although expensive, professional piano tuners earn every cent that they make and work hard for their money. When you’re paying their bill you should consider it a bargain.
Now I’m about to say something that I hate saying but it’s an unfortunate reality.
If you don’t already own a piano, you would be wise not to get one. They’re beautiful instruments but decent ones are really expensive, inexpensive ones will break your heart and no matter what you purchase, it will require constant tuning and upkeep to keep it working properly.
You’re much better off going with a decent digital piano at this point in time. They never go out of tune and the piano action (keys and associated parts) are often better quality than that of an acoustic. Most digitals use audio samples from some of the best sounding pianos in the world with perfect tuning and will sound better than any real piano you will probably buy. On top of that with digitals you can wear headphones while your practicing (trust me no one wants to hear you practice) which allows you to play any time, day or night. As an added bonus, many have additional features which make the music more fun. For example, some have built in drum sequencers allowing you to practice with a drum track instead of with a metronome.
The only people that should consider an acoustic piano are professional concert pianists and people with lots of money that want to have a nice piece of art in their house. Just remember though, it’s going to cost you.